This website contains content related to firearm components and building tools. Access is strictly limited to persons of legal age according to their jurisdiction. By entering this site, you affirm and certify the following:
1. I am at least 18 years old for long gun components 2. I am at least 21 years old for handgun components 3. I am NOT a prohibited person under federal law (18 U.S.C. § 922(g)) 4. I am in a jurisdiction where accessing this content is legal 5. I understand that misrepresentation may constitute a crime
I’ve done it both ways. I’ve ordered stripped uppers, sourced every component separately, and spent a Saturday afternoon threading a barrel into a receiver with an armorers wrench while watching YouTube on loop. I’ve also ordered complete uppers, dropped them onto a finished lower, and been at the range by noon the same day.
Neither approach is wrong. They’re just different experiences that suit different builders at different moments. What I want to do here is be straight with you about the real differences — cost, tools, time, and what you actually end up with — so you don’t overspend chasing a build experience you don’t actually want, or underbuy and find yourself staring at a stripped receiver with no clear path to a finished rifle.
Table of Contents
The Stripped Upper: What You’re Actually Getting
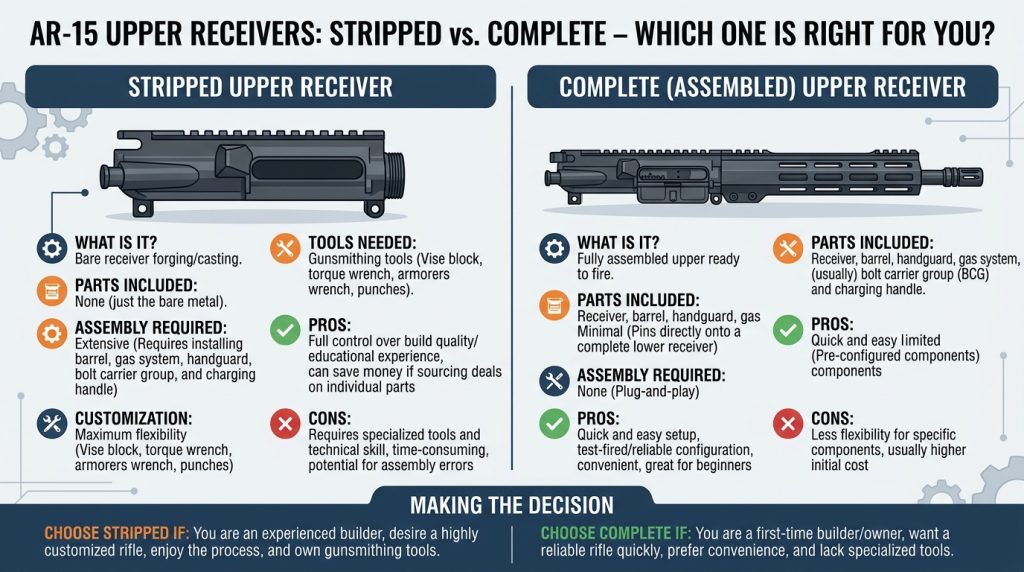
A stripped upper receiver is exactly what the name says — the bare receiver body, stripped of everything. You’re getting an aluminum forging or billet piece machined to mil-spec dimensions with a threaded barrel extension opening at the front, a picatinny rail on top, and the cuts and holes needed to accept the rest of the components. That’s it. No barrel. No bolt carrier group. No charging handle. No handguard. Just the body.
What this means in practice is that you’re signing up to source and assemble every component yourself. That list includes:
To complete a stripped upper you’ll need:
• Barrel — length and profile are your choice
• Barrel nut — often comes with handguard
• Handguard / free-float rail — M-LOK, KeyMod, or Picatinny
• Gas block and gas tube — matched to your barrel’s gas port location
• Muzzle device — flash hider, compensator, or bare muzzle crown
• Bolt carrier group (BCG) — the heart of the operating system
• Charging handle — mil-spec or extended latch aftermarket
• Forward assist and dust cover — sometimes already installed on the stripped receiver
Assembling a stripped upper requires an armorers wrench for the barrel nut, a torque wrench to hit the correct spec (typically 30–80 ft-lbs depending on the nut style), a bench vise with an upper receiver block, a roll pin punch set, and some patience with the gas tube and gas block alignment. It’s not gunsmithing-level work, but it’s a step above snapping components together. If you haven’t done it before, budget an afternoon and watch a dedicated video for each sub-step before you start.
The one place first-timers consistently underestimate the stripped upper build: torquing the barrel nut correctly. Too loose and you’ll have accuracy and reliability issues. Too tight and you risk damaging the receiver threads. A torque wrench isn’t optional on this step — it’s the tool that makes the build right.
The Complete AR-15 Upper: What’s Already Done for You
A complete upper — sometimes called a complete upper assembly or assembled upper — arrives with the barrel, bolt carrier group, charging handle, handguard, gas system, and muzzle device already installed and timed correctly. Some complete uppers include everything except the BCG and charging handle, which are sold separately; others include the full package. Always read the product description carefully so you know exactly what ships in the box.
A fully complete upper assembly typically includes:
• Upper receiver — assembled and inspected
• Barrel — installed and torqued to spec
• Handguard / rail — installed with correct barrel nut
• Gas block and gas tube — installed and timed
• Muzzle device — installed and timed (if included)
• Bolt carrier group — headspaced to the barrel
• Charging handle — installed and functional
Mating a complete upper to a finished lower takes about 20 minutes. You seat the front takedown pin, close the upper, drive the rear takedown pin, function check, and you’re done. No armorers wrench, no torque spec lookup, no gas tube alignment. The assembly work was done at the factory or by the vendor, and the component choices were made for you.
The trade-off is customization. When you buy a complete upper, you’re accepting whatever barrel profile, handguard length, and gas system the manufacturer paired together. For most shooters building a standard 5.56 or .300 Blackout carbine, those decisions are fine as-made and represent good engineering choices. For a builder with very specific requirements — a particular barrel length for a suppressor build, a specific handguard for a rail-mounted system, a non-standard gas length — the complete upper may not hit the spec you need.
Cost: Where the Numbers Actually Land
This is where the conversation gets real. A quality stripped upper receiver body runs $60 to $120 for a mil-spec forged aluminum option from established manufacturers like Aero Precision or BCM. That sounds cheap until you add the barrel ($120–$300 for a quality option), BCG ($100–$200), handguard ($60–$150), gas system ($30–$60), charging handle ($20–$80), and muzzle device ($30–$80). By the time you’re done sourcing parts for a quality stripped upper build, you’re at $420 to $870 in components alone — before tools.
A quality complete upper from the same tier of manufacturers runs $350 to $700 and includes everything listed above, already assembled and function-tested. You’re often paying less for the complete assembly than you would sourcing equivalent components separately, because manufacturers buy in volume and pass some of that savings through.
The stripped upper saves money only in specific scenarios: when you already own most of the components, when you’re building to a spec that doesn’t exist as a complete unit, or when you’re sourcing parts over time and spreading the cost. For a builder starting from zero who just wants a quality upper, the complete assembly is almost always the better value and the faster path to a finished rifle.
polymer80firearms.com carries both stripped and complete upper options. If you’re building your first AR and you want to get to the range without an armorer’s wrench in your shopping cart, the complete uppers in the catalog are worth a close look. If you want to spec every component yourself and you have the tools to do it right, the stripped uppers are there for that too.
Skill Level: Be Honest With Yourself
There’s no shame in buying a complete upper. The AR-15 platform is modular by design — that’s a feature, not a workaround. Using a complete upper on a custom lower doesn’t make the build less yours. The lower is where the serialized component and the build work live on an AR. The upper is the barrel assembly. Using a quality complete upper means your custom lower gets mated to a professionally assembled, properly headspaced barrel system, which is actually a good outcome.
The stripped upper build makes most sense when you have the tools, have watched the process enough times to be confident, and have a specific configuration in mind that doesn’t exist off-the-shelf. Experienced builders often prefer it because the satisfaction of a fully custom spec outweighs the extra time and cost. First-time builders often find the complete upper route removes friction at a point in the process where friction is the main obstacle between them and a finished rifle.
Side by Side
Category
Stripped Upper
Complete Upper
What’s included
Receiver body only
Receiver + barrel + BCG + CH + handguard
Entry cost
$60–$120 (plus parts)
$350–$700+ (ready to go)
Tools needed
Armorers wrench, vise, punches, torque wrench
Virtually none for assembly
Customization
Total — every part your choice
Limited — swap only what you want to change
Build time
2–4 hours for a first timer
20–30 minutes to mate to lower
Skill level
Intermediate
Beginner-friendly
Best for
Builders, tinkerers, spec chasers
Shooters who want it running fast
Who Should Buy What
Go stripped upper if you…
• Have the tools and are comfortable using them
• Have a specific component spec in mind that doesn’t exist as a complete assembly
• Are spreading the build cost over time by sourcing parts gradually
• Want the satisfaction of a fully custom, every-part-chosen-by-hand build
• Are building your second or third AR and want more control over the outcome
Go complete upper if you…
• Are building your first AR and want to minimize friction
• Don’t own an armorers wrench or torque wrench and don’t want to buy them
• Want to be at the range quickly without a sourcing project
• Are happy with mil-spec component choices from a quality manufacturer
• Are pairing the upper with a custom Polymer80 80% lower as a hybrid build
Either path ends with the same thing: a functional AR-15 upper ready to run. The difference is how much of the assembly work you do yourself and how specific your build requirements are. Know which builder you are right now, pick accordingly, and get the rifle finished.
Browse stripped and complete AR-15 upper receivers — along with 80% lowers, jig kits, and complete build components — at polymer80firearms.com. If you have questions about which upper pairs best with your lower build, the support team is available to help you spec it out.