This website contains content related to firearm components and building tools. Access is strictly limited to persons of legal age according to their jurisdiction. By entering this site, you affirm and certify the following:
1. I am at least 18 years old for long gun components 2. I am at least 21 years old for handgun components 3. I am NOT a prohibited person under federal law (18 U.S.C. § 922(g)) 4. I am in a jurisdiction where accessing this content is legal 5. I understand that misrepresentation may constitute a crime
Let me be upfront with you: the first time I built a Polymer80 pistol, I second-guessed myself at almost every step. Was that pin seated all the way? Did that spring go in the right direction? Is this thing actually going to work?
It did work. And by the second build, it felt routine. By the third, I was helping someone else through their first one.
That’s kind of the thing about Polymer80 builds — the learning curve is real but short. If you’re comfortable with basic tools and can follow instructions, you can absolutely do this. This guide is going to walk you through the entire process from choosing your frame all the way to function-checking a finished pistol. Let’s get into it.
Important: Polymer80 frames sold through polymer80firearms.com are serialized firearms. They require transfer through a licensed FFL dealer and a federal background check (Form 4473), the same as any handgun purchase. Make sure you have a local FFL lined up before you order.
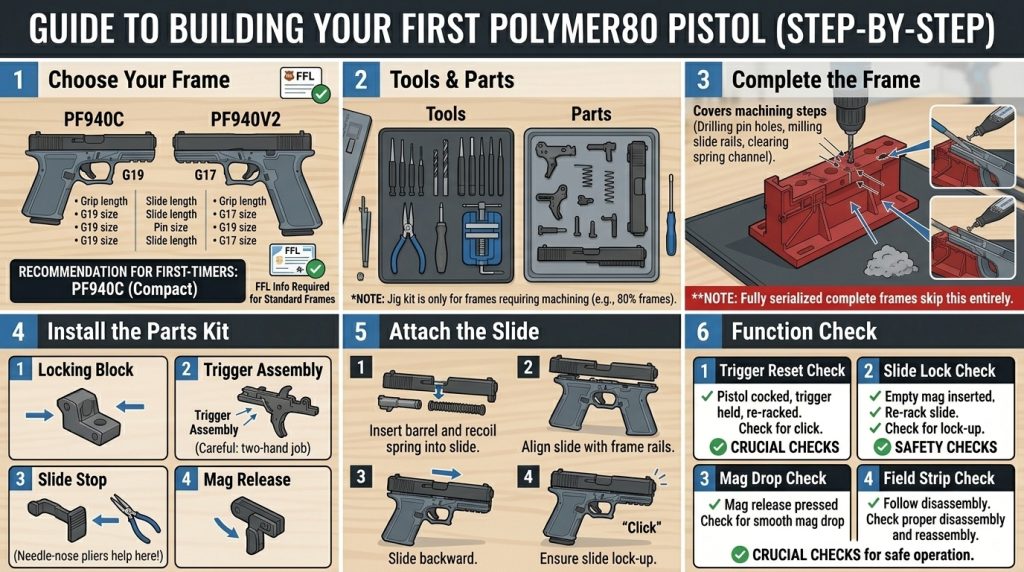
Step 1: Choose Your Frame
This is your starting point, and the decision is mostly about what size pistol you want to end up with.
Polymer80 makes several frame options, but the two most popular for first builds are:
PF940C — The compact frame. Compatible with Glock 19 and G23 components. This is the go-to choice if you want something you can conceal carry or if you just prefer a smaller, lighter pistol. Most people’s first build is a PF940C, and for good reason.
PF940V2 — The full-size frame. Compatible with Glock 17 and G22 components. Better if you want a larger grip, a longer sight radius, or you’re building primarily for home defense or range use.
Both frames are excellent. If you’re on the fence, go compact. The PF940C is more versatile, and if you ever want a full-size down the road, you’ll have the skills to build one without any hand-holding.
Once you’ve picked your frame, order it through polymer80firearms.com and provide your local FFL dealer’s information at checkout. The frame will ship directly to your FFL. Everything else — the slide, barrel, parts kit, and tools — ships straight to your door.
Step 2: Gather Your Tools and Parts
Don’t skip this step. Walking into a build without the right tools is a great way to end up frustrated on a Saturday afternoon. Here’s what you need:
Tools
Punch set (1/16″, 3/32″, and 1/8″ are the ones you’ll actually use)
Rubber or nylon hammer — you don’t want to be smashing steel punches with a metal hammer on a polymer frame
Flat-head screwdriver
Needle-nose pliers
Bench block or a block of wood to punch against
Build mat or a clean towel — trust me, small springs will disappear forever on a bare floor
A good light source
If your frame requires any machining steps to complete (some Polymer80 frames come as 80% complete), you’ll also need a compatible jig kit, a drill press or hand drill, and the appropriate end mill or drill bits. The jig kit from polymer80firearms.com is designed specifically for these frames and includes everything you need for that part of the process.
Parts
Serialized Polymer80 frame (picked up from your FFL after background check)
Slide — complete or stripped with barrel installed separately
Barrel — matched to your caliber and frame size
Recoil spring assembly
All of these are available at polymer80firearms.com. If you’re buying a complete slide assembly with the barrel and recoil spring included, you can skip sourcing those individually and save yourself some steps.
Pro tip: Before your first build, watch at least one full build video on YouTube specific to your frame model. Reading instructions and watching someone do it are different experiences, and seeing the spring orientation once is worth more than re-reading a paragraph five times.
Step 3: Complete the Frame (If Required)
This step only applies if you have a frame that still requires some machining to finish. If you ordered a fully serialized, completed frame, skip to Step 4.
If your frame needs completion:
Install the jig — Follow the instructions included with your jig kit. The jig holds the frame securely and guides your drill bits to exactly the right positions. Don’t try to eyeball this freehand.
Drill the pin holes — Use the correct bit sizes as specified in your jig instructions. Go slow, keep your drill press perpendicular, and use cutting oil if you have it. Polymer cuts easily but you want clean holes.
Mill the fire control cavity — This is where a router or end mill clears the remaining material from the frame’s interior. Again, let the jig do the guiding. Take light passes and don’t rush.
Clean it up — Remove the frame from the jig, clear out any polymer shavings with a brush or compressed air, and do a visual inspection of the fire control cavity to make sure everything looks clean and uniform.
Take your time here. The machining step is the one where most first-timers make mistakes, and almost all of those mistakes come from rushing. If something doesn’t look right, stop and figure out why before moving on.
Step 4: Install the Parts Kit
This is where the frame actually starts becoming a pistol, and honestly, this is the part I enjoy most. Here’s the sequence:
Locking Block
Drop the locking block into the frame — it sits in the front of the fire control cavity and should seat flush.
Drive the front cross pin through the frame and locking block using your 3/32″ punch and hammer. It should feel snug but not require excessive force.
Trigger Assembly
If your trigger came pre-assembled in a housing, good — drop it in. If not, you’ll need to assemble the trigger bar, connector, and housing first. Refer to your parts kit instructions for the exact configuration.
Set the trigger assembly into the frame and hold it in place while you drive the rear cross pin through. This is usually a two-hand job — some people use a small punch to hold the assembly aligned while they drive the pin from the other side.
Slide Stop Lever and Magazine Release
Insert the slide stop lever into its cutout on the left side of the frame, making sure the spring end is seated correctly.
Install the magazine release from the right side of the frame, then insert the magazine release spring and button from the left. This part can be fiddly — needle-nose pliers help with spring compression.
If a pin won’t go in cleanly, don’t hammer harder — check your alignment first. Pins that go in crooked can crack polymer. Take a breath, realign, and try again with lighter taps.
Step 5: Attach the Slide Assembly
With the frame fully assembled, you’re ready to attach the slide. This part is satisfying because it’s the moment the thing actually looks like a pistol.
Install the recoil spring assembly onto the barrel, and insert the barrel into the slide.
Hold the frame with your support hand and tilt the rear of the slide down onto the frame rails.
Push the slide rearward until the slide stop lever can be seated into the disassembly notch.
Lower the front of the slide onto the frame, then push it forward until it locks into battery.
Give the slide a firm push forward and backward a few times to make sure it’s tracking smoothly on the frame rails.
If the slide is binding or feels sticky, don’t force it. Check that all your frame pins are fully seated and that nothing is catching on the locking block or trigger assembly.
Step 6: Function Check the Finished Pistol
This is not optional. Before this pistol ever sees a round of ammunition, you run a function check. Every time, no exceptions.
Here’s how to do a proper function check on a Polymer80 Glock-compatible build:
Verify the pistol is unloaded — visually and physically inspect the chamber and magazine well.
Trigger reset check — pull the trigger (you should hear and feel the striker fall), then hold the trigger back while you rack the slide. Slowly release the trigger — you should feel and hear a distinct click as the trigger resets. No click means something in your trigger assembly needs attention.
Slide lock check — lock the slide back manually and confirm the slide stop lever holds it securely.
Magazine drop check — insert an empty magazine and press the release. It should drop freely without resistance.
Field strip check — perform a basic disassembly and reassembly to confirm everything lines up as it should.
If the pistol passes all of these checks, you’re ready to take it to the range. Your first trip out should be a slow, deliberate test fire — start with a box of quality ammunition and pay attention to how the pistol feeds, ejects, and resets. Some new builds need a short break-in period before everything smooths out.
You Built a Pistol. Now What?
Seriously — take a minute to appreciate that. You started with a frame and a pile of parts and ended up with a functional, reliable pistol that you built with your own hands. That’s not nothing.
A few things to keep in mind going forward: keep your build records. Note your serial number, the parts you used, and when the build was completed. Store your firearm safely and responsibly. And if you have any questions about compliance, parts compatibility, or your next build, the team at polymer80firearms.com is there to help.
Most people who do one Polymer80 build end up doing another. It’s that kind of hobby. Once you understand how the platform works, the next build goes faster — and you start thinking about what you’d do differently.
Good luck. You’ve got this.
Ready to get started? Browse the full selection of Polymer80 frames, slides, parts kits, jig sets, and build tools at polymer80firearms.com. We ship to all eligible states and support FFL transfers nationwide.